Intel offers fans the performance of various features on the Z370 chipset, from "Everything can be overclocked!" to "Even PCI Express CPU paths are not locked!" But motherboard designers may still feel a bit stuck in terms of how to use all those resources on a small Mini-ITX board.
ASROCK FATAL1TY Z370 GAMING-ITX / AC
PROS
- Excellent CPU overclocking
- Good overall efficiency
- High-end Wi-Fi/Bluetooth controller
- Onboard Intel Thunderbolt 3
CONS
- Mediocre DRAM overclocking
- Only one onboard M.2 slot
- Onboard Thunderbolt 3 controller is lesser 20Gb/s, single-port version
DECISION
The Fatal1ty Z370 Gaming-ITX / ac extends the Mini-ITX option to mainstream-CPU overclockers, while adding Thunderbolt 3 into the mix. However, we recommend buyers choose their favorite Z370 Mini-ITX board based mainly on what connectors they need.
The tight board spacing means that every Mini-ITX board demands a compromise. A board that offers support for four DIMMs will be required to use a compact and stylish SODIMM laptop highly shunned by desktop builders. Otherwise, you get two full-size DIMMs, max.
In addition, SLI and CrossFire do not even consider on a single slot board. And, in general, the option to break the PCI Express CPU path to much faster storage has been abandoned by one 16-track x16 slot.
What does it mean for the Z370 motherboard? Overclocking is now the only reason to choose a board based on Z370 versus H370 chipsets, and ASRock is determined to make sure they do it right. Does the company succeed?

Oh, we get RGB lighting that is often seen on big boards, but in smaller doses: Fatal1ty-series boards have fewer LEDs than MSI and rival Asus Mini-ITX, but still come with RGB headers to help the right users loves the lights controlled by the motherboard putting that talent on their case. In addition, Z370 Gaming-ITX / ac has something that rivals do not have: Intel Thunderbolt 3.
Specifications AsRock Fatal1ty Z370
- Socket : LGA 1151
- Chipset : Intel Z370
- Form Factor : Mini ITX
- Voltage Regulator : 7 Phases
- Video Ports : (1) DisplayPort 1.2, (1) HDMI 1.4
- USB Ports : 10Gbps: (1) Type-C (via Thunderbolt 3) 5Gb/s: (6) Type A
- Network Jacks : (1) Gigabit Ethernet, (2) Wi-Fi Antenna
- Audio Jacks : (6) Analog, (1) Digital Out
- Legacy Ports/Jacks : (1) PS/2
- Other Ports/Jacks : Thunderbolt 3 at 20Gb/s max, CLR_CMOS Button
- PCIe x16 (1) v3.0 (full bandwidth)
- PCIe x8 : ✗
- PCIe x4 : ✗
- PCIe x1 : ✗
- CrossFire/SLI : ✗ / ✗
- DIMM Slots : (2) DDR4
- M.2 Slots : (1) PCIe 3.0 x4 / SATA* (*Consumes SATA Port 0
- U.2 Ports : ✗
- SATA Ports : (6) 6Gb/s (Port 0 shared w/M.2)
- USB Headers : (1) v3.0, (1) v2.0
- Fan Headers : (3) 4-Pin
- Legacy Interfaces : ✗
- Other Interfaces : FP-Audio, RGB-LED, PC (beep code) Speaker
- Diagnostics Panel : ✗
- Internal Button/Switch ; ✗ / ✗
- SATA/RAID Controllers : Integrated (0/1/5/10)
- Ethernet Controllers ; WGI219V PHY
- Wi-Fi/Bluetooth Controllers : Intel 8265 802.11ac 2x2 (867mb/s) / BT 4.2 Combo
- USB Controllers : JHL6240 Thunderbolt 3 PCIe 3.0 x2
- HD Audio Codec : ALC1220
- DDL/DTS Connect : ✗
But wait, you heard that Thunderbolt 3 is 40Gb / s, right? So what's with a single 20Gb / s port? It turns out that ASRock uses a two-way Intel controller to get 16Gb / s of PCIe bandwidth, add onboard video pass-through to increase Thunderbolt monitor capability and upgrade port ratings to 20Gb / s. The same port also hosts the USB 3.1 Gen2 device, therefore listed two ways in the feature table. The competing MSI boards use a two-lane USB controller to feed two I / O-panel ports, and the competing Asus board uses the same USB controller to feed the front panel port 10 Gb / s, so the benefits of ASRock are very limited .

Z370 Gaming-ITX / ac buyers also get six USB 3.0 ports (aka USB 3.1 Gen1), a pair of prominent Wi-Fi antenna connectors behind the Key-E riser module, PS / 2 keyboard and mouse port, digital optical audio, HDMI and DisplayPort, Gigabit Ethernet, and six analog audio jacks. The CLR_CMOS button makes it easier to recover from overclocking attempts that fail without opening a ready built case.

Three four-pin fan headers are scattered on the edge of the Z370 Gaming-ITX / ac, and RGB LED connectors, USB 3.0 and 2.0 front panel, two SATA, and undocumented UART connectors are in front. Although only one of the fan headers can be routed from PWM to the voltage control mode, at least no headers are blocked by the graphics card. The beep-code speaker header is the only thing we found under the leading edge of the slot, and almost no one bothers to connect it again.
Of the four SATA ports located between the memory slot and the PCH heat sink, my installation experience shows that two possibilities will be unreachable under stand-alone single tower CPU coolers. Oh, and we want to wish good (and patience) to those who use these four SATA headers along with low-profile CPU cooling.

We expect every enthusiastic motherboard to have at least two M.2 slots, regardless of its form factor, but ASRock does not find space for the second slot. That's unfortunate, because one of the two main competitors, Asus, did it. The relationship between the Z370 and LGA 1151 CPU sockets is just as fast as the drive interface, but many fans want a second drive. The PCIe-to-M.2 adapter can be a faster option for storage geeks that do not use x16 slots for anything else, but they work together on competitor boards.

Z370 Gaming-ITX / ac includes driver and documentation disks, two SATA cables, I / O shield, Wi-Fi antenna with Velcro ribbon, and foil-glue sticker case.
Software & Firmware ASRock Fatal1ty Z370
Fatal1ty-series motherboards include Sound Blaster Cinema 3 software (which adds 3D synthesized on speakers or stereo headphones), Crystalizer (to increase music loyalty), Smart Volume (to reduce dynamic range in playback situations like movies with loud music) Plus dialog (to increase dialog volume above background noise / music), and Bass Boost.

Shared between all motherboards that support RGB, RGB ASRock LED software is just a copy of its firmware menu.

The EZ OC EZ OC ASR option references all "CPU Optimized OC" programs from the firmware, assigns them, and requires a reboot to load the firmware's profile. The button for its "Auto Tuning" algorithm can only be accessed after enabling one of the programmable overclocks from 4.6 GHz upwards, and it actually slows our CPU to the below stock frequency by setting 4.50GHz "fixed" at 1.30V ... while implementing a 300MHz reduction for AVX based payload. The settings produce Prime95 running at 4.20GHz rather than 4.30GHz stock, and the game runs at 4.50GHz rather than the 4.70GHz stock.

Manual overclocks F-Stream is also firmware-based, and users who are really willing to push something can use it in the same way as firmware settings. The advantage of using software is that BCLK, CPU Ratio, and voltage levels can be adjusted quickly, which we confirm.
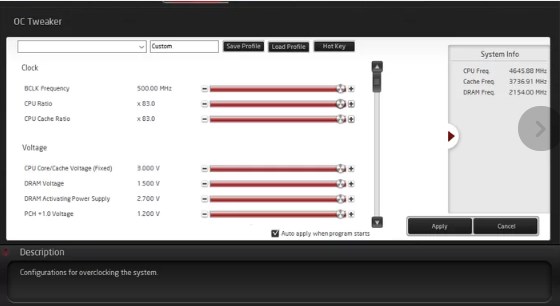
The System Info tab displays useful reading, and it's even honest enough to reveal a large over-voltage 40mV-to-50mV from our 1.35V DIMM. It will not cut it for our overclocking testing.
There is also a useful streaming utility brought from the firmware menu. Users can choose a profile, create a profile, or create a program to create a profile based on the minimum and maximum speed of the fans.
Firmware
As always, UEFI ASRock opens for the Easy Mode interface that is not so easy to use, but allows users to enable XMP profiles, change some storage settings, and select fan profiles. Limitations may be set to entertain less-initiated builders.

A quick knock on the F6 key takes the user to "Advanced Mode", where M.I.T. menu provides a list of overclocking menus, storage of up to five configurations, tools for importing and exporting such configurations using flash drives, and a group of overclocking profiles specified by the manufacturer. This profile ranges from 4.50GHz at a stock voltage up to 5.0GHz at 1.50V, but all use an AVX offset ratio that knocks the CPU up to 4.30GHz under AVX load like the Prime95 small-FFT we use for stability test.

We easily push our CPU to 4.85GHz, and our memory easily surpasses DDR4-4000, but the automatic stability-compensation time adjustment gives us our best memory performance on its DDR4-3866 XMP rating.
Not that we can not set our own advanced timings to make DDR4-4000 perform better than DDR4-3866; it's just that there are so many adjustments available that taking the right combination will take days. Starting with DDR4-4000 will set the bar a bit higher, but with the same behavior on top of that bar.

Also note above that we set DRAM to 1.30V. Our meter showed 1.349V at the DIMM slot with that setting, and fine-tuning wasn’t available, since the board supports only 50mV intervals. Users should know that the Z370 Gaming-ITX/ac will default their DRAM to around 1.4V even with XMP disabled. Best CPU longevity is thereby achieved by selecting a lower voltage of your own accord.
A tired overclocker pressing F6 on any UEFI entry can change the UEFI Settings Style to "Advance Mode"; the sale was found under the Advanced Advanced Mode menu. (Confusing, we know.)
The "Tools" menu includes basic controls for RGB lighting, email delivery services for technical support, tools for copying RAID drivers to thumb drives, flashing firmware devices, firmware download tools, and network configuration pages that help users get online to use some other tools.

Tiga header kipas dapat diberi kemiringan khusus dari halaman Tuning FAN-Tastic dari menu Monitor H / W, tetapi hanya satu dari header kipas yang memberikan manfaat tegangan berbasis voltase. Tombol kipas untuk mengaktifkan kecepatan maksimum dan minimum dan menciptakan kemiringan yang sesuai.
Also Read More :
- Review The Cheap NVMe ON MyDigitalSSD SBX SSD
- Review Laptop The Acer Swift 3e SF315 Ryzen Meets
- Asus ROG Strix Z370-F Gaming ATX Motherboard Review: Holding Lines On Values
- Qualcomm Snapdragon 700 Series - Specs, Features & Everything We Know So Far
- Review Hexa-core Processor for Laptops Intel Core i7-8750H